This is an updated version of this post, which was specific to the CE3 and CE4 versions of the TTG Cart. Really not much of difference other than where you make some settings.
The TTG Cart for Backlight, allows photographers to sell digital downloads. After a visitor purchases a digital download, they’re sent a link to where they can download the file. It works really well.
If you’re using Lightroom Publisher, these downloadable files can be created and uploaded automatically without you needing to do anything other than click the Publish button. (If you’re not using Lightroom to upload your images, then you’ll need to create all rendition sizes.)
If you’re not using Publisher, upload them manually to a folder within your album. You will need to manually create this folder.
The details on manual uploading images for purchase are here.
Occasionally, the question comes up about selling digital downloads of the same image at different sizes in the same album. Perhaps you want to offer a high-res version suitable for magazine publication as well as low-resolution images more suited to web usage.
If you’re using Lightroom Publisher, you should realize that Lightroom is capable of creating only one rendition of an image for digital download. By default, these renditions are placed in a protected folder that’s named “photos-for-download”. As outlined in the document linked to above, if you’re not using Publisher then you need to manually create this folder, add the files that will protect it from unauthorized access, and upload your images.
So far it appears that you can only offer one size of digital download. But what if you want to offer more?
It’s actually rather easy to do this. It’s not really documented in the TTG documentation so I’ll outline the steps here.
Cart setup
First, you need to create the products in the Cart. So log in to Backight, go to Cart, and click on Products. The cart comes with some pre-made products, including Digital Download, so you should already have a Digital Download product.
In the Products window, click on the Edit link next to Digital Downloads. Notice the Download Directory. It’s set by default as “photos-for-download.” Base Pricing is single price. You could also add Product Attributes if you like. These could be things like licensing rights. Later you would attach prices to those rights. But for our current purpose, let’s just leave all that empty. If you like, you can change the title of this product to be more descriptive, like “High-Res digital Downloads.” That’s up to you. I think I’ll make that change. Be sure to click Save Product.
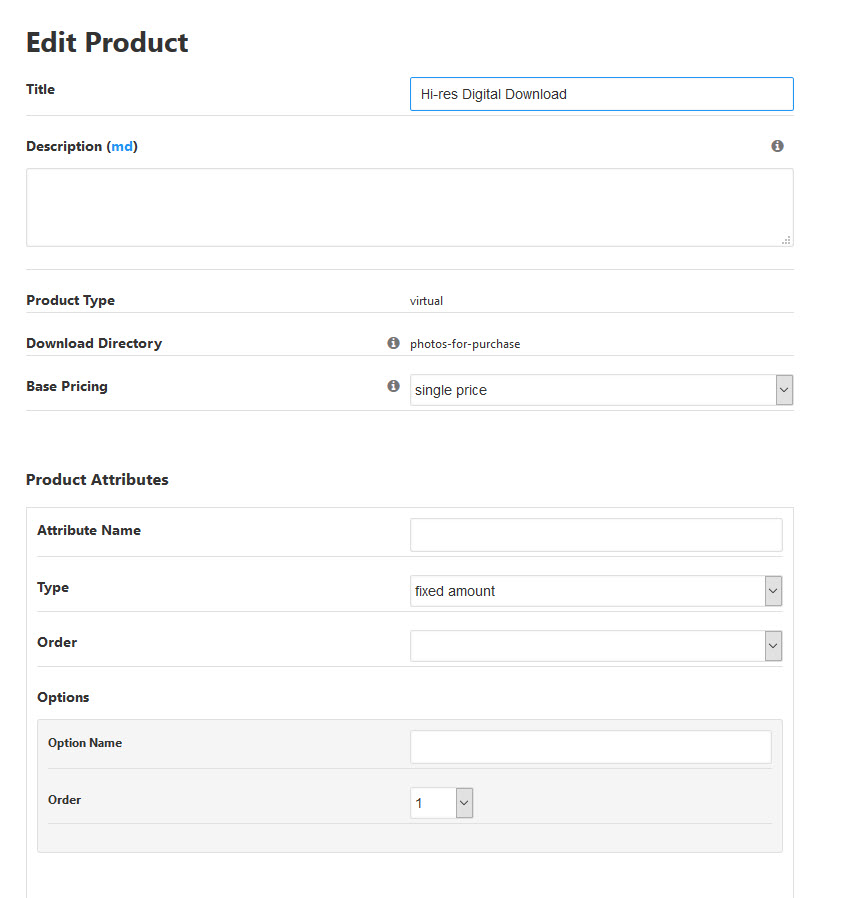
So at this point you have one product for Hi-res Digital Downloads.
Now let’s create another product for web-resolution downloads.
Back in the main Products page, click on Add Product.
Give it a title. Here I’m going to use “web resolution.” Add a description if you like.
For Product Type, choose digital download.
Set Base Pricing to single price.
Again, if you wanted to add rights attributes, you could do so. I’m not going to do that here.
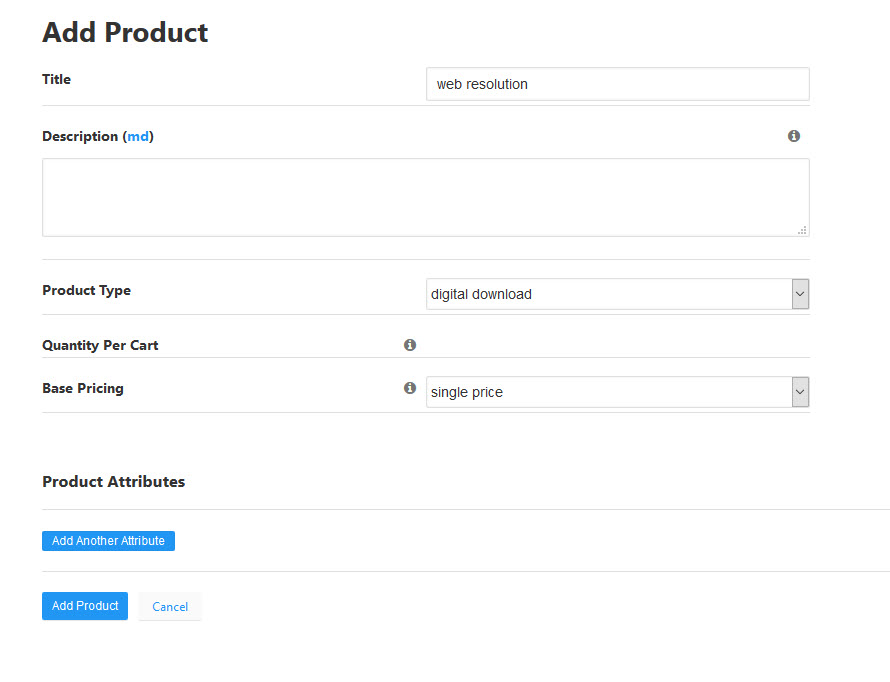
Have you noticed that something is missing? What about that Download Directory folder? We’ll get to that next.
Click the Add Product button. This will take you back to the Products page and you’ll see that “web resolution” has been added.
Now click on the Edit link next to “web resolution.” You’ll see in the Edit Product dialog box that there is now a field for the Download Directory. Fill this in with the name of a folder. Later you’ll be adding this folder to your albums manually. Use only letters, numbers, dashes, or underscores in your name. Do not use spaces. The name of my folder is going to be “web-res-photos-purchase”.
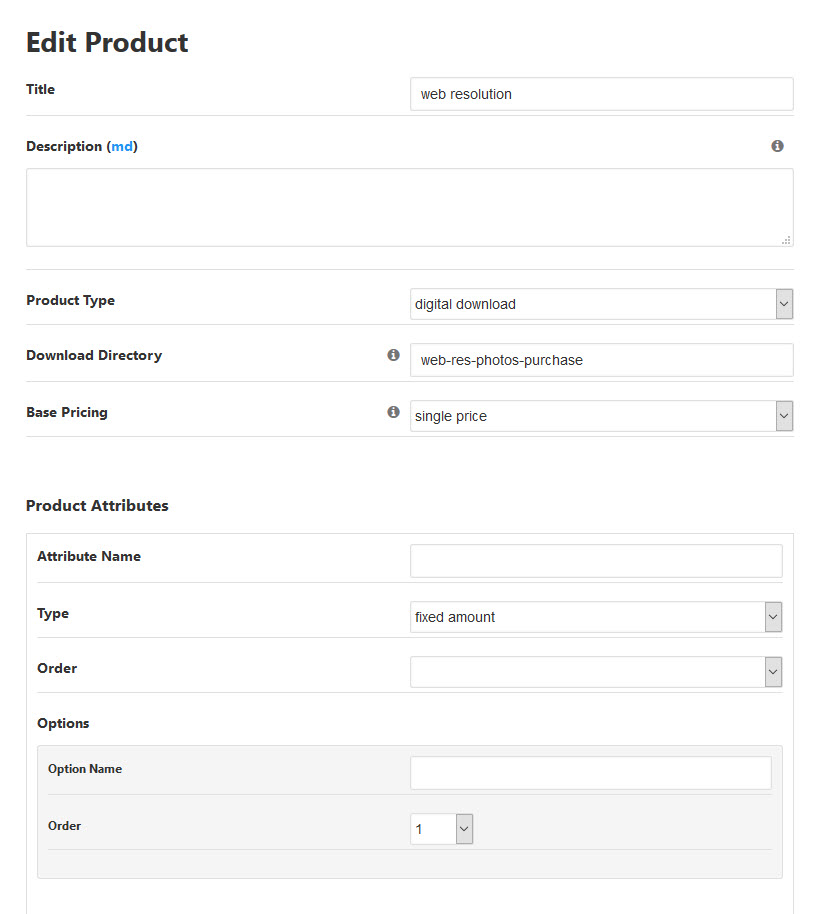
Click on the Save Product button.
Now let’s create a pricing scheme that will offer both digital download products.
In Backlight, from the Cart menu drop-down click on the Pricing menu item and choose Pricing Schemes. By default, the cart already had two schemes: “default” and “premium.” You could modify either of these if you like, but let’s create a new pricing scheme just for our digital download offerings.
Click the Add Pricing Scheme button.
Give your pricing scheme a name. As far as I can tell, it doesn’t matter if you include spaces in the name.
Check the products you wish to offer with this pricing scheme. In this case, I’m checking “Hi-res digital download” and “web resolution.” Later you’ll also have the option of placing items in the order you wish.
Click Add Pricing Scheme.

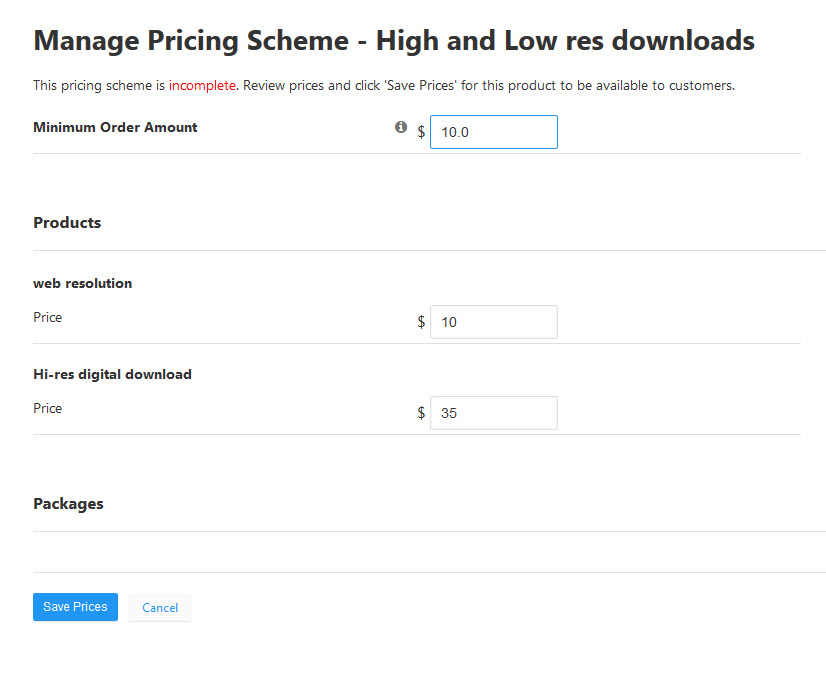
You’ll be taken back to the Pricing Schemes window. You should see your new pricing scheme along with the word “incomplete” in red under Status.
First, click on Edit Products. In the window that opens you can set the order in which the product will appear in the Add-to-Cart dialog when your visitors click on the Cart icon in the album. Click Save Pricing Scheme. Then click on the Manage Pricing link for the Pricing Scheme and fill in your prices and Minimum Order Amount.
Ok, the Cart setup is ready.
Create an album template
In Backlight, create a new album template and enable the Cart Add-on.
If you’re using Publisher to create hi-res download renditions, make those settings here. Decide on image size, color space, and sharpening.
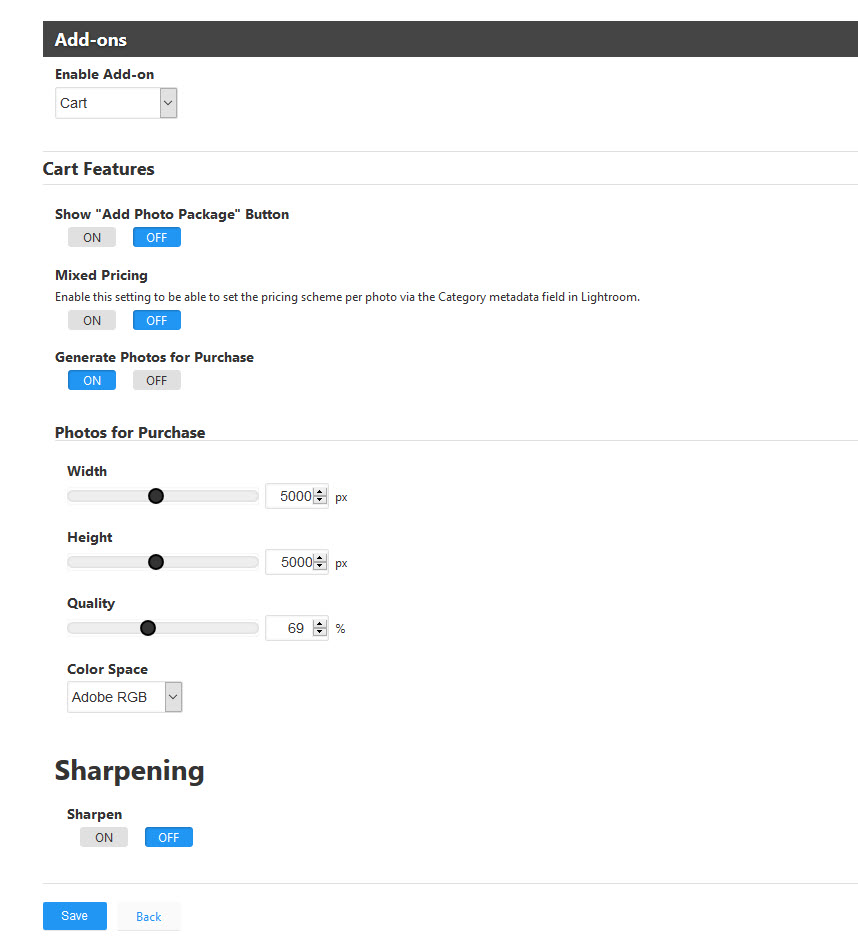
For the purposes of this tutorial, I’m going to assume that all images in the gallery will be available for digital download purchase only. If you want to have only some available for digital download, then use the Mixed Pricing option. More on that here.
Finish up any other settings you need in the album template and save it.
Create an album
If using Publisher, create an album as you normally would. In the Base Settings tab, choose the template you just created. If you’re creating albums directly in Backlight, choose the album template in the Base Settings tab.
Click on the Integration tab (in the Lightroom or Backlight Create/Edit album dialog) and check Enable Cart. Then write in the Pricing Scheme you just created.
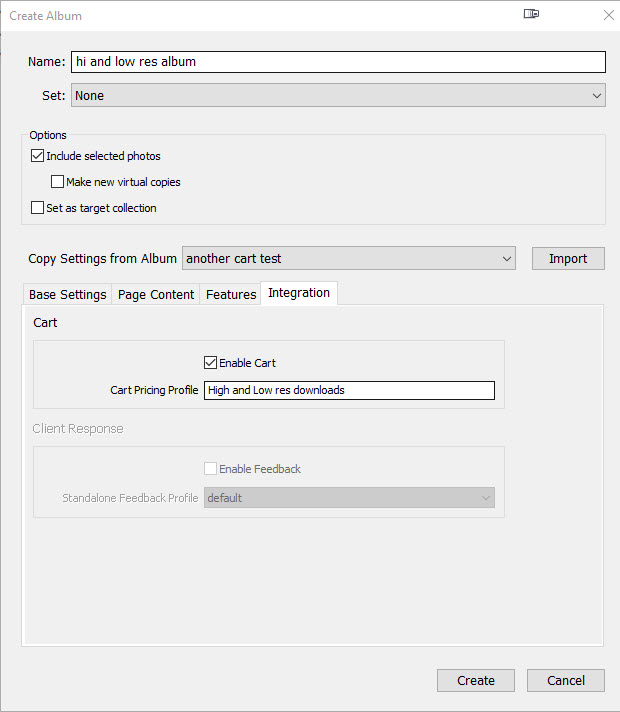
Click Create. If you hadn’t already selected images for this Album add them now and click Publish. Publisher will upload the album and create the renditions for the high-res digital downloads.
If you’re not using Publisher to create the photos-for-download folder, you’ll need to create one on the server inside the album folder.
You’ll also need to create the “web-res-photos-purchase” folder for the low-resolution images and upload the low resolution images to the folder. When creating these two folders, don’t forget to add the files that protect the folder from unauthorized access. Again, the instructions for that are here.
(Backlight update: get the needed files from /backlight/modules/module-cart/application/skeleton)
For Publisher users, you now have the high-resolution images in the automatically created “photos-for-download” folder. But you still need to add the web resolution folder manually and upload those files via FTP. It is important that both versions of an image (High and low resolution) have the exact same file name.
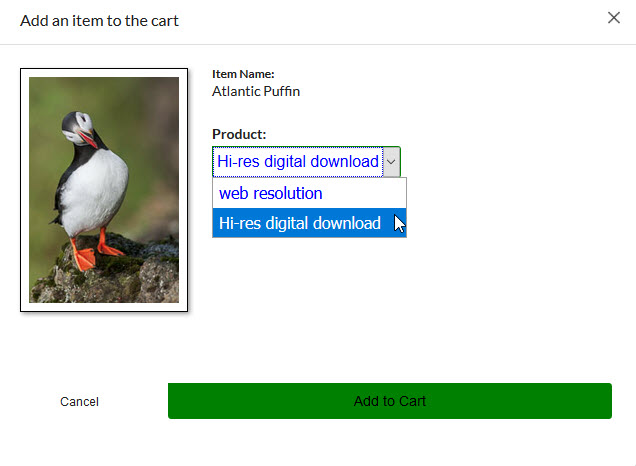
Now when you go to your gallery and click on the Add-to-Cart button, there should be a drop-down for the product giving you the choice between ‘Hi-res download’ and “web resolution.”
Using this method, you can create as many digital download versions of an image as you want. You could have 5000 px hi-res, 3000 px hi-res, 1000 px medium-res, 600 px low-res, and 150px thumbnail-res if you so choose. You will need to create the extra folders and create and upload the extra renditions, but it’s possible. The important thing to remember is to name each file in all renditions exactly the same. You can’t name them, for example, image-name-001-5000px, image-name-001-3000px, etc. They all must be image-name-001 otherwise the download won’t work because the file will not be found.
Also remember to add the folder protection files to each folder you create.
Variation: Tiff downloads
Some of you may need to offer tiff files for download. If this is the case, Publisher cannot provide those images for you, it can only process out jpg images. So you’ll need to go the manual uploading route as described above. In fact, you could offer any file type as long as the base file names match those of the images in the gallery.

