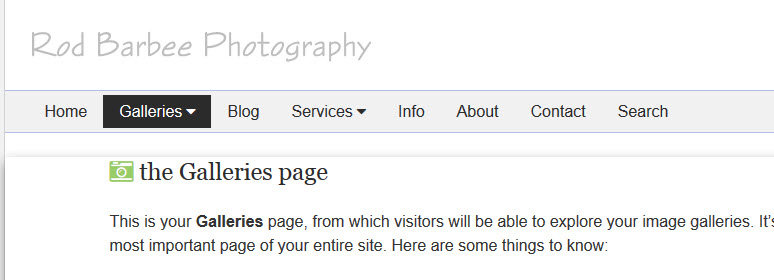
NOTE: this was written for the CE3 version of the TTG plugins, it works for CE4 as well.
For those using the TTG Lightroom Web Gallery plug-ins, here’s a quick and easy way for highlighting the current page navigation menu item. As is, the plug-ins let you set colors for text and background for the link in both normal and hovered states. That is, the link looks one way when simply looking at it and another way when you hover your mouse over it. You’ve all seen this.
Some people also like to have the current page’s link in the navigation menu to be highlighted so that their visitors can easily tell what page they’re viewing. But there’s no way within the plug-ins to change the look of a link based on what page is being viewed. However, with just a little bit of custom css and a short jquery script, you can add this functionality.
First of all, you’ll need to enable phplugins. Do this for all TTG pages, galleries, indexes, etc. The documentation on how to do that is here. Be sure to set up for global (site-wide) use.
If you’re using Publisher, you’ll only need to update, export and upload your publisher gallery and autoindex templates. If you’ve got an extensive site with lots of galleries or other pages that are not Publisher managed, you’ll need to update, export, and upload all of these individually. As far as the uploading part, you can get away with uploading just the index and mobile files (index.php and mobile.php). You may or may not have a mobile.php file; that depends on plug-in settings.
Note: if you also have index.html files left over from a previous export, you can safely delete those. Use of phplugins requires that your pages be exported as php files. The html files are no longer used.
Once you have phplugins enabled for all your pages, you’ll need to activate the Custom css section of your global phplugins.php file. That documentation is here.
Believe it or not, that was the hard part.
Now you’re set up so that all of your pages will be receiving the same custom css file. We’ll get to adding code to that in a minute, but first, let’s set up the jquery script that will make all of this work. Here’s the script. I found it with just a short Google search and have modified it for the TTG page structure. This works for both single-level and multi-level (drop down) navigation:
<script>

$(document).ready(function() {

$("#navigation a").each(function() {

if ($(this).prop("href") == window.location.href) {

$(this).addClass("selected");

}

});

});

</script>
So what does this do? The first line after the script tag simply tells the script to wait to execute until the page is loaded. That’s pretty standard stuff from what I’ve been learning (hey, I’m kinda new to this).
The next line tells the function to look at the page and select links (the ‘a’) that are inside the navigation div (#navigation).
The script then looks to see if any of those links match the URL of the current page. If any of them do, it then adds the css class of “selected” to that <a> tag (the link).
That’s all that does. It just adds the “selected” class to the menu link of the current page.
So now we need to get that script into all of our pages. A good place to do that is right after all the other scripts have loaded in the head section of the page. To do this, we use the ttg_head_end phplugins hook in your phplugins.php file. But look, we’re already using that to activate the custom css. Not a problem. Put your mouse cursor at the end of this line and hit enter:
<link href="/phplugins/css/custom.css" rel="stylesheet" />
Now copy the above script (including the script tags and paste it right after the above line and save the file.
This part of your phplugins.php file should now look like this:
function ttg_head_end( $style, $path ) {

echo '

<link rel="stylesheet" href="/phplugins/css/custom.css" />
<script>
$(document).ready(function() {
$(“#navigation li a”).each(function() {
if ($(this).prop(“href”) == window.location.href) {
$(this).addClass(“selected”);
}
});
});
</script>
‘;
} // END
So now all of your pages will add the “selected” class to the menu link of the current page, if it exists. Visually, this by itself does nothing. Next we’ll create the “selected” css class and add some styles.
Using a plain text editor, open the custom.css file you’ll find inside the phplugins/css/ folder.
Add this code:
.selected {

background-color: #2b2b2b !important;

color: white !important;

}
This adds a dark, nearly black background to the menu link and changes the color of the text to white. I’ve included the !important declaration so that other, more specific rules won’t override the styles.
Set the colors to whatever you like or add borders or any other styles you want.
Now be sure to upload the phplugins.php and custom.css files to their proper location on your server.
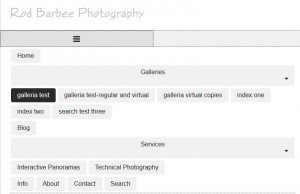
Note that when visiting one of your gallery pages on the desktop, you won’t see any highlighted menu links. That’s because there is no menu item for individual galleries. You will, however, see the highlighting in the mobile menu. So be sure to resize your browser and see what happens when the navigation collapses into the mobile menu. Depending on other colors you may have set (like the Collapsed Menu background-color), you may run into clashing or matching colors).
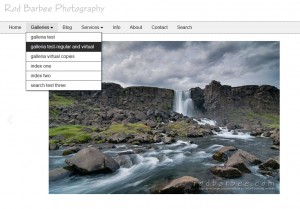
If you’re using the drop-down navigation feature of TTG (also requires the use of phplugins) you’ll see that the drop-down items will be affected by the script and will take on the same styling.
One caveat: If the url to any of your navigation items goes to a folder, be sure to add a forward slash ( / ) to the url or the navigation item won’t be highlighted.
For example, if you’ve set up a search page and you’ve set the url to simply /search, the Search label won’t be highlighted in the menu when you’re on the Search page. Change the url to /search/ and it should work fine.
UPDATE FOR BACKLIGHT
I received a question in the comments about making this work for Backlight. I’d like to say that I came up with this by myself but my javascript and jQuery skills are at the very basic level. So I asked Matt. And Matt came through. Below is the function to place in your phplugins.php file. The css above is still valid.
function ttg_scripts( $style, $path ) {

echo '

<script>

$(document).ready(function() {

$(".menu li").each( function() {

var loc = $(this).find("a:first").attr("href"),

windo = window.location.pathname

;

if( loc == windo ){

$(this).addClass("selected");

}

});

});

</script>

';

return false;

} // END
And Ben came up with something better:
function ttg_scripts( $style, $path ) {

echo <<<SCRIPT
<script>
	$(function() {
		$("ul.menu a[href='" + window.location.pathname + "']").addClass("selected");
	});
</script>
SCRIPT;

} // END
And he also provided an alternate in case you wish to have the parent item highlighted when you’re on a child page:
$("ul.menu a[href='" + window.location.pathname + "']").addClass("selected").parents('li').children().addClass('selected');for more details visit this topic in the TTG Backlight Tips and Tricks forum.


Hi Rod
good tip, but only fully useful if there will also a possibility to highlight the menu in desktop modus. No chance to achieve this?
Huh? It works on the desktop.That’s where the screen shots came from. I’m using this on my test site:http://ce4.barbeephoto.com/
(at least on pages that are phplugins enabled)
you wrote:
<>
did I misunderstand that?
Note that when visiting one of your gallery pages on the desktop, you won’t see any highlighted menu links. That’s because there is no menu item for individual galleries. You will, however, see the highlighting in the mobile menu.
That totally depends upon whether or not the page you’re visiting has phplugins enabled. As it’s a test site, not all pages, galleries, or indexes have that set up. Some do. This page, for instance:
http://ce4.barbeephoto.com/galleries/album-set-with-ad-in-template/
if you hover over the Galleries link in the main nav menu of that page, you’ll see in the drop down that the active page is highlighted.
This will also depend on that page’s order in the autoindex. Only the first eight items on the Galleries page will show up on the drop-down. (this can be changed in the autoindex code).
Also, pages inside of autoindexes won’t show up in the drop-down (the autoindex only looks down one level, so any drop-downs shown from the main menu are from those items directly in the /galleries/ folder.
I have phplugins enabled, using the “normal” single level navigation menu (not the drop down menu). I will give it a try again in the next days.
In that case, only the main menu items will ever be highlighted when you’re on those particular pages. Indexes and galleries won’t be because they’re not in the main menu.
Hello Rod,
how does that work in the new TTG Backlight?
Best regards,
Oliver
I imagine the same way as it would work in CE4. I’ve not tried it yet though. You’ll need to change the selectors for the navigation.
this line:
$(“#navigation a”).each(function() {
Will need to be changed to something like this:
$(“ul.primary-menu li.menu-item a”).each(function() {
If I get a chance to test this I’ll update the post.
Hi Rod,
thank you.
what else do I have to change to get it work?
I don’t know. I played with it a bit yesterday but couldn’t get it to work. It might have something to do with how the pages are generated in Backlight.
I wrote to Matt and he’s provided some code that works for this. I’ve updated the post above.
Rod, Matt & Ben,
thank you so much !!!
Best regards,
Oliver